DW Spectrum User Manual
Hotspots are click-able icons placed over a video stream that allows users to quickly navigate to another device or shared layout. This feature is useful for tracking an object of interest as it travels between the view of multiple cameras or to quickly view a location from different perspectives.
Hotspot Features:
•Hotspot are moveable, freely positioned icons that reside on a video stream overlay.
•Hotspot icons can include a optional directional pointer and color tint.
•Only Administrators and Power Users can create, edit, or delete Hotspots.
•While there is no limit to number of Hotspots created for a camera, only so many will Hotspot icons fit over a video stream.
•All users who can view the device or camera can toggle the Hotspot layer (see "Users and Groups").
•Hotspots respond to mouse hover, mouse click, and will present a context menu on mouse right-click.
•Hotspots are disabled by default and must be enabled for each device or camera in the Site (see "Setting Up Cameras and Devices").
•Hotspots are only available in the Desktop Client and do not exist in other DW Spectrum clients or services.
•Each instance of a camera or video stream can be independently be configured to have the Hotspot layer active and displayed, or disabled and hidden.
•Hotspots remain in a fixed X-Y position over the display and are not affected by Image Controls or Pan, Tilt, and Zoom movements.
oUse a PTZ preset to record the the camera position that is aligned with precisely placed Hotspots.
To Add or Edit a Hotspot using the Desktop Client
1.Open Camera Settings by doing one of the following:
•Navigate to Main Menu > Site Administration > Camera List and either double click a camera, or right click on a camera in the camera list, and select Camera Settings...
•Right-click on a camera name in the resource panel or right-click on a camera stream placed in a layout to open the context menu, then select Camera Settings...
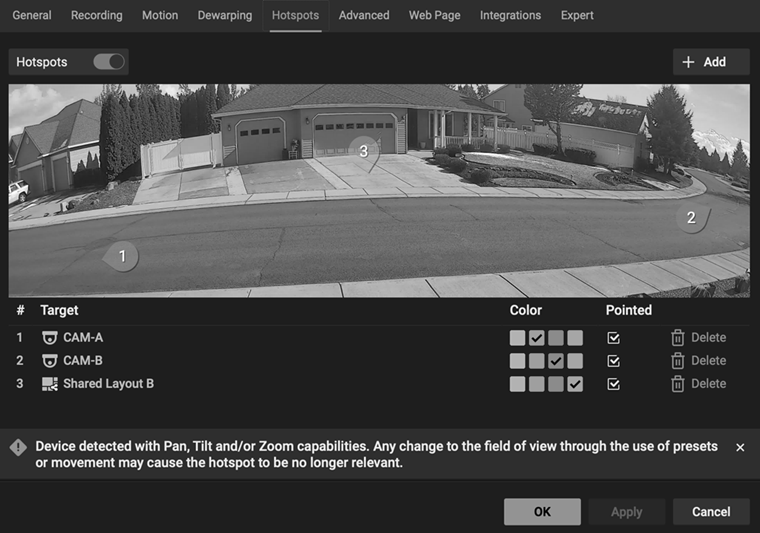
2.Select to the Hotspots tab in the Camera Settings dialog.
3.Set the switch for Hotspots to the on (visible and active) position.
4.Click the Add button and the next sequential Hotspot number is added to the center of the Camera display.
5.Drag the Hotspot to any available, non-overlapping location on the Camera display.
6.Select a Hotspot to configure from the list:
•Select a target for the from the list of resources presented.
•Choose a color tint for the Hotspot
•If the Pointed icon feature is enabled, set the direction of the target.
7.Select a Hotspot from the list to configure it, and then a
a.Repeat this step to reconfigure any Hotspot labeled Select Camera.
8.Apply changes to remain in the Hotspot dialog or click OK to apply settings and exit the Camera Settings dialog.
NOTE: All created Hotspots not linked to a target will be removed when the Hotspot dialog is closed. Removed Hotspots will logically decrement remaining Hotspot numbers.
Using Hotspots
•If not displayed, activate the Hotspot layer using Keyboard Shortcut ("H") or by Clicking the Hotspot icon in the display title bar.
•Hovering the mouse pointer over a camera Hotspot will present a preview of the target.
•Hovering the mouse pointer over a Layout icon will display the title of the shared Layout. Layout Hotspots do not provide a preview or thumbnail.
•Clicking on a camera Hotspot will highlight the target camera on the active layout, or add the target camera to the active layout if it is not already present.
•Right Clicking will open a contextual menu based on where it is opened:
oThe context menu for a camera hotspot includes the option to open the camera, open the camera in a new tab (of the active client), or open the camera in place (replace current grid item with the target camera).
oThe context menu for a shared layout hotspot offers to open the target layout in a new tab.
To Delete a Hotspot using the Desktop Client
1.Open Camera Settings by doing one of the follow:
•Main Menu > Site Administration > Camera List and double click a Camera.
•Open Camera Settings... using the context menu on the Viewing Grid or a Camera name in Resources Panel.
2.Change to the Hotspots tab in the Camera Settings dialog.
3.Remove Hotspots using the Delete (trashcan) icon above the list of Hotspots.
NOTE: Deleted Hotspots cannot be restored.