DW Spectrum User Manual
The camera replacement feature facilitates the transfer of data from an existing camera to a new one. This allows the new camera to access the original camera's archive, recording schedule, and primary settings, provided the models exchanged are compatible.
Key Concepts:
•Camera replacement only supports single-channel cameras when replaced by another single-channel camera on the same Server.
•This camera replacement process can only be initiated by Administrator and Power Users.
•Camera replacement cannot be undone – a repaired camera should never be reinstalled on it's previous server.
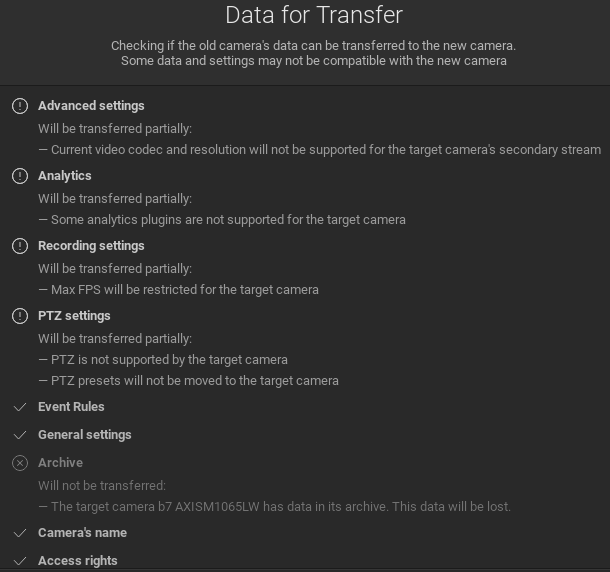
•Available options and a summary of the data transfer plan will be presented for acceptance before the transfer is started.
•The following data and settings can be transferred:
oArchive.
oCamera’s name.
oAccess rights.
oAnalytics.
oEvent rules.
oPTZ settings.
oGeneral settings.
oRecording settings.
oAdvanced settings.
• The following data and settings cannot be transferred:
oMotion Detection settings.
oTwo-Way audio.
•Camera replacement does not support the following device types:
oMulti-sensor cameras.
oVirtual cameras.
oSpeakers.
oNVRs.
oUnauthorized Cameras.
oIO modules.
oOffline cameras that appeared after an Archive Reindex and Scan was performed.
oCameras that were previous replaced.
How to Replace a Camera
1.Make sure the camera to be replaced is disconnected and appears as offline in the Site.
2.Right-click the desired offline camera in the Resource Panel.
3.Select the Replace Camera option.
4.Select a camera to replace the current one.
5.Apply changes.
A transfer summary is presented before the transfer begins.