Dewarping Fish-Eye Cameras |
  
|
Dewarping Fish-Eye Cameras |
|
Once dewarp is configured, as indicated by the presence of the dewarping ![]() icon in layout, a fish-eye camera image can be dewarped and will also have PTZ controls available.
icon in layout, a fish-eye camera image can be dewarped and will also have PTZ controls available.
Zoom windows created from a fish-eye image are dewarped automatically. The current dewarping state is always applied to screenshots, and it is possible to apply dewarping to a screenshot after it is captured. The option to apply dewarping to exported video can be turned on or off in the Export Video dialog using Apply Filters.
![]() Note: Dewarping a fish-eye camera will set its resolution to high.
Note: Dewarping a fish-eye camera will set its resolution to high.
To apply dewarping
1.Click the dewarping ![]() icon to activate dewarping mode:
icon to activate dewarping mode:
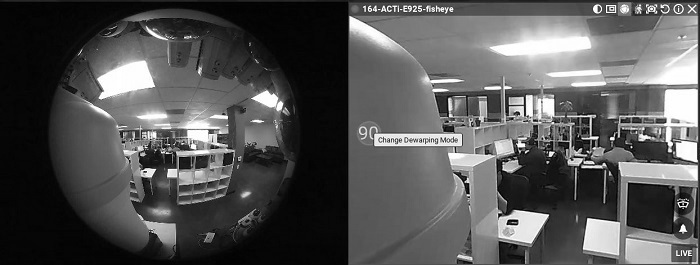
2.Click the Change Dewarping Mode button in layout to show the image as a 90, 180, or 360 degree panoramic view, as indicated by the button. Note that 360 degree panoramic mode is not available to cameras that are configured as wall mounted.
3.Use PTZ controls as desired. See "Controlling Pan, Tilt, and Zoom (PTZ)".
4.Click ![]() again to hide controls and disable dewarping.
again to hide controls and disable dewarping.
To dewarp a fish-eye screenshot or local video file
1.Right-click on the file to open the context menu and select File Settings.
2.Click on the Fisheye Dewarping button to enable (green) the distortion correction parameters.
3.Configure dewarping as described in "Configuring Fish-Eye Cameras".