DW Spectrum User Manual
The recording schedule is where you define when and at what quality a device will be recorded, using a weekly calendar divided into 1 hour blocks.
The recording schedule is always based on VMS time. When Motion Detection is enabled, you can set regions of the image that will register motion, and how sensitive to motion those regions will be (see "Setting up Motion Detection").
 Note: If recording is not enabled, motion detection will only be active when the camera is being viewed in a layout.
Remember that image quality settings in the recording schedule dictate image quality in live playback as well.
 IMPORTANT: If no license is available, the "License is required" error will appear above the recording schedule and prevent recording from being enabled. The recording schedule and settings will be inaccessible until a valid license is added.
Desktop Client
1.Select the desired camera(s) in the Resource Tree or in layout.
Note: The Recording Schedule on auto-discovered cameras comes with the following settings by default: Motion Only, High Quality, and Max FPS.
2.Choose Camera Settings in the context menu and go to the Recording tab.
3.Click the Recording button at the upper-left to enable recording.
Note that the total number of licenses available and the number of licenses in use is displayed below this button. If the number of available licenses is insufficient, you can click the Activate License button and proceed with activation.
4.If desired, set the frames-per-second (FPS) rate and Quality (Low, Medium, High, or Best) that will apply to the device(s). When available for the selected device, you can also adjust the Bitrate by clicking on More Settings.
IMPORTANT: If changes to streamed settings are prohibited at the system level (see "Preventing DW Spectrum from Changing Manufacturer Settings"), image quality settings in the recording schedule are ignored (the FPS and Quality fields will be disabled).
5.If desired, check the Show Quality and Show FPS boxes to display those respective values in the recording schedule calendar.
6.If desired, adjust the length of time that will be added to the recording before (Pre-Recording) and after (Post-Recording) motion or an object is detected. Pre-Recording can be set up to 90 seconds, and Post-Recording can be set up to 300 seconds.
7.If desired, use the Keep Archive For... fields to assign high or low priority to the camera's archive.
IMPORTANT: It is best to leave Min. and Max. set to Auto unless you have specific related requirements (see "Configuring Minimum and Maximum Archive Storage").
8.Select the desired Recording Type – Motion, Objects, or Motion & Objects. This will selection will change the type of Recording Modes to choose from.
9.Select the desired Recording Mode:
•Record Always
•Motion Only / Objects Only / Motion & Objects Only
•Motion + Lo-Res / Objects + Lo-Res / Motion & Objects + Lo-Res
•Do Not Record
A blue outline around the button indicates the active recording mode (see "Recording Modes").
10.Once the above parameters are set, click hour blocks in the calendar to apply a recording mode:
•Click-and-drag to select multiple time blocks
•Click on an hour number to select that block of time for an entire week
•Click on a day name to select an entire day
•Click All to select the entire week
Note:You can use Alt + Click to copy the recording mode in a given block so it can be applied to a different block.
IMPORTANT: First choose FPS, Quality and bitrate values and then apply them to the calendar. Stream setting values are not in effect until time block(s) are selected.
10.Repeat the above steps as desired to schedule other recording modes. Note that quality settings are independent of the recording mode. (This is illustrated in the example below, where some Motion + Lo-Res blocks are at 15 FPS/High quality and others are at 10 FPS/Low quality.)
11. Apply changes.
Example
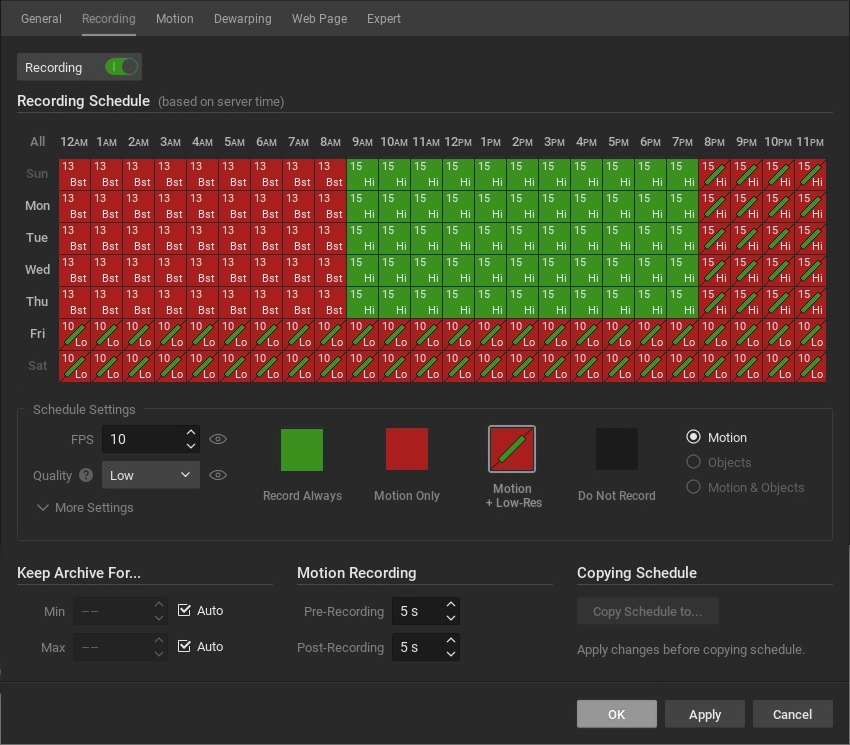
This example uses the following settings:
•Mon – Fri, 9:00 AM-7:59 PM – Record Always, 15 FPS, High quality
•Mon – Fri, 8:00 PM-11:59 PM – Motion + Lo-Res, 15 FPS, High quality
•Sat & Sun, 24 hours – Motion + Lo-Res, 10 FPS, Low quality
•Mon – Fri, 12:00 AM-8:59 AM – Motion Only, 13 FPS, Best quality