DW Spectrum User Manual
When DW Spectrum Client is first launched, the Welcome Screen (shown below) automatically detects and displays the Systems in your local networks and Systems that have been recently accessed. Local Systems can be accessed with a username and password. If a user is logged into DW Cloud, Cloud Systems are also displayed. No login is required to open DW Cloud portal. See "Logging in to DW Cloud" for details.
 Note: When accessing a cloud connected multi-server System, the Desktop Client attempts to connect to the server with the best uplink. Alternatively, you can choose a specific server in the System for the Desktop Client to connect to, if unreachable, it attempts to connect to another server.
The number of System tiles displayed on the Welcome Screen is determined by your screen and window size.
Use the search bar above the tiles to search for a specific System by certain attributes:
•System name
•Server name
•IP address
•System owner (cloud only)
•User's email (cloud only)
Systems that are unavailable at the moment are grayed out and may be deleted from the display. If a system is hidden, it will not be shown in the list of tiles when the All Systems display mode is selected.
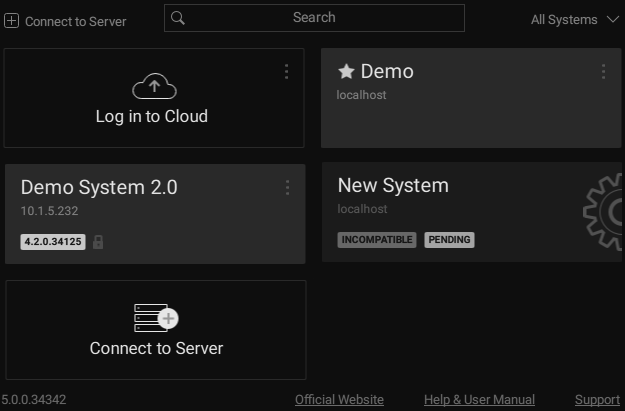
The Client can connect to Systems running different version of DW Spectrum. The product version is displayed in a yellow block on the lower right corner of the System tile if it is not the same version as the Client. If a System is incompatible with the Client, the block will be red. See "Launching DW Spectrum in Compatibility Mode" for information on resolving Desktop Client/System version discrepancies.
 IMPORTANT: Compatible hardware supports Safe Mode booting. The hardware boots up in Safe Mode if something has happened during a previous boot. In this case it is possible to connect to a server, but it is not possible to perform any configuration.
To Connect to a System
Click on the tile for the desired System. If it is compatible with the client a connection dialog will open.
1.Enter a login and password.
Note: Optionally, check Remember me so in the future clicking on the tile will connect directly to the System using the saved credentials.
2.Click Connect.
If there are 10 or more unsuccessful attempts to log in from a given IP address within 5 minutes, all log in attempts from that IP address will be denied for 1 minute.
Display Modes
The Welcome Screen has three display mode options which can be accessed in the upper-right corner.
•All Systems – displays all Systems on the network that have not yet been hidden or removed (default display mode)
•Favorites – displays all Systems added to the list of Favorites.
•Hidden – displays all Systems marked to be hidden from other display modes.
To Edit, Hide, or Favorite a System Connection
For local Systems that are online, a context menu is available that lets you edit or hide the System tile. Click on the three dots in the upper-right corner to open this menu.
•Edit – expands the tile to the connection dialog without logging to the System. Fields that can be edited will display a pencil icon when the cursor hovers over them. This is useful, for example, if you need to log in using a different account or server address. The Remember me option can be toggled.
•Hide – moves the System tile from the default All Systems display mode to the Hidden display mode.
•Add to Favorites – moves the System tile up in the list when in All Systems mode and adds the System tile to the Favorites display mode for easy access.
•Delete – removes the System completely (option only appears for offline and incompatible Systems). The tile won't appear on the Welcome Screen again unless the System is online.
Working Offline
Even when you are not connected to a System, the Welcome Screen main menu provides the following:
•Connect to server – lets you connect to a specific server using its IP address (see "Connecting to a Specific Server").
•Browse Local Files – use the Welcome Screen as a media player (see "Playing Local Video Files in DW Spectrum").
•New – launches a Welcome Screen in a new window.
•Start Screen Recording – toggles the recording of the entire screen (see "Screen Recording (Windows Only)").
•Local Settings – opens the Local Settings dialog where you can choose language, display time and other global setting (see "Customizing Look and Feel of DW Spectrum").
•About – displays important System and network configuration information (see "Collecting Additional Information").
•Exit – closes the window (Alt+F4)