Configuring Backup and Redundant Storage |
  
|
Configuring Backup and Redundant Storage |
|
Storage backup duplicates the footage in archive and saves it to other available locations, which can be local HDDs, SSDs, NAS, IPSAN, DAS, or even off-site cloud-based locations such as FTP sites. Note that each server only backs up recordings from its own storage archives. In a multi-server environment, a backup storage location should be specified for every server in the System in order to back up footage from all cameras.
•Backups can be executed in real-time, when explicitly requested, or as scheduled.
•Backups can be configured to copy captured high-resolution streams, low-resolution streams, or all streams.
•Backups can be configured for specific cameras.
Once a backup has been executed, backup archives can still be directly played and accessed via the Client. For example, you might have local storage for 7 days of footage and backup storage for 30 days. If you backup your local storage once per week, you can still play back video from all backed up video.
![]() IMPORTANT: To configure either backup or redundant storage it is necessary to define at least one main and one backup storage location as described in "Configuring Server and NAS Storage".
IMPORTANT: To configure either backup or redundant storage it is necessary to define at least one main and one backup storage location as described in "Configuring Server and NAS Storage".
To configure storage backup
Make sure you have added your storage location to the server. Backup settings can be saved even if a backup storage location is not defined or is not currently attached. A small alert displays under the Backup Archive section of Server Settings > Storage Management if there is no backup storage drive or if no cameras have been selected.
1.Right-click on a server in the Resource Panel and choose Server Settings.
2.In the Storage Management tab, click on the Backup Settings button to open the Backup Settings dialog.
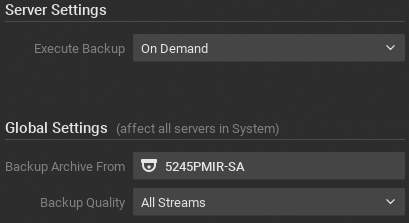
2.Click Backup Archive From to select the cameras to backup. In the Select Device to Backup list that opens, check Backup newly added devices to discover and include devices that are be added to the System later.
3.Use the Backup Quality menu to select the backup quality (Hi-Res, Lo-Res, or All) based on your available bandwidth.
4.Use Execute Backup to choose a backup type:
•On Demand (manual) – backup occurs only when Start Backup Now button in Server Settings > Storage Management tab is pressed, and continues until all data is backed up or the operation is canceled. Only previous data is backed up.
•Real-Time (redundant) – footage is written to main and backup location(s) immediately and simultaneously. When selected, the following warning is displayed: "Only further recording will be backed up. Backup process will ignore existing footage.".
•By Schedule – backup is performed on specific days of week, between specific start and finish hours, or Until finished. Only previous data is backed up in this case. Note that the footage will be backed up since the last time backup was completed. If network bandwidth is insufficient, the backup may not be fully completed within the specified time frame. In this case the date and time of the footage that was backed up will be clearly indicated (Archive backup complete until...). There is an option to Limit Bandwidth to a certain Mbit/s. Note, however, that too tight a bandwidth constraint can cause the entire backup to fail.
When archive backup is complete a corresponding notification event is triggered. See "Archive Backup Finished". There is also an internal archive integrity check so that if archive files are changed or removed, users who are actively viewing that archive will be notified. See "Archive Integrity Check Failure"..
To configure redundant storage
With this structure, each server will back up footage to all other servers in the System. This will reduce the overall amount of stored footage but provides healthy redundancy. Note that each server backs up the archive for selected cameras, but if a camera is moved to a different server, backup will include only the portion archived before the camera was moved.
1.Make sure each server is available and accessible through the network.
2.On each server, create a shared folder on a separate HDD to prevent System malfunction.
3.Make \\server\shared accessible through the network.
4.Go to Server Settings and add all shared folders as NAS devices.
5.Set to Backup for each one added.
6.Repeat the above steps on all servers.
7.Configure backup parameters as described above. It is best that servers perform their backup at different times, otherwise recording speed may be too low. When many servers use the same drive for recording it can lead to I/O errors or insufficient write speed.